Blogging is a fantastic way of sharing your voice, and it can even earn you an income if you’re dedicated and focused. However, even as blogs continue to become more popular, getting started can be intimidating. But does it have to be? I say no! In this post, I’ll give you some proven strategies and tips on how to start a blog in 2023. You’ll find out how to choose a niche, create content, grow your audience, and get revenue from your blog.
But how do you start a blog from scratch? What are the steps involved? How do you choose a niche, a platform, a domain name, and a hosting provider? How do you create content, attract traffic, and monetize your blog?
In this comprehensive guide, I will show you how to start a blog in 2023 and turn it into a successful online business. Whether you want to blog for fun, for passion, or for profit, this guide will help you achieve your blogging goals.
- Blogging is a popular way to express yourself, connect with others and achieve your goals.
- Starting a blog in 2023 can seem daunting, but it doesn’t have to be.
- You don’t need technical skills or experience to start a blog from scratch.
- In this guide, we’ll show you the steps involved and best practices to follow.
- We’ll cover everything from choosing a niche, setting up your blog, creating content, promoting your blog, and monetizing your blog.
- By the end of this guide, you’ll have a fully functional and professional-looking blog that you can be proud of.
- So, whether you’re looking to share your passion, build your brand, or make money online, let’s get started!
By following this guide, you will learn, How-to:
- Choose a niche for your blog
- Pick a platform and a domain name for your blog
- Set up your blog with Bluehost and WordPress
- Choose a theme for your blog
- Design and customize your blog
- Create and publish your first blog post
- Promote your blog and drive traffic
- Make money with your blog
Step 1: Choose a Niche
Choosing a niche is the first step in starting a blog. Your niche should be something you are passionate about and know a lot about. This will assist you in producing high-quality content that your readers will appreciate and find useful. Furthermore, focusing on a niche can assist you in establishing yourself as an authority in your field and attracting a more targeted audience.
Some popular niches are:
- Travel
- Food
- Fashion
- Beauty
- Fitness
- Health
- Personal finance
- Business
- Marketing
- Technology
Deciding a niche is critical because it allows you to define your target audience, create relevant content, and differentiate yourself from the competition. A niche also allows you to monetize your blog more effectively by offering products or services that are relevant to your audience’s needs and interests.
“What many professional bloggers will tell you that starting with something you care about will help you keep up a regular writing timeline and push through failure to succeed.”
But how do you choose a niche for your blog? Here are some tips to help you:
- Choose something that you are passionate about. Because blogging takes a lot of time and effort, you should enjoy what you’re writing about. Select a niche that corresponds to your hobbies, interests, skills, or experiences. If you enjoy travelling, for example, you can start a travel blog and share your experiences, tips, and recommendations.
- Pick a topic about which you are knowledgeable. Blogging also necessitates a significant amount of research and learning, so you should be an expert or authority on your subject. Select a niche that highlights your abilities, qualifications, or credentials. If you are a fitness trainer, for example, you can start a fitness blog to share your workouts, nutrition advice, and coaching services.
- Choose something profitable. Blogging is both a hobby and a business opportunity. Choose a market niche with high demand and low competition. To determine how popular and profitable your niche is, use tools such as Google Trends, Google Keyword Planner, or SEMrush. If you want to start a personal finance blog, for example, you can use these tools to determine how many people are searching for keywords related to your niche, such as “how to save money,” “how to invest,” or “how to budget.”
- Pick something that is specific. Blogging is not only about writing but also about connecting with your audience. Choose a niche that is narrow enough to attract a loyal and engaged following. You can use tools like AnswerThePublic or Quora to find out what questions or problems your audience has related to your niche. For example, if you want to start a food blog, you can use these tools to find out what recipes, cuisines, or diets your audience is interested in.
Once you have chosen a niche for your blog, you can move on to the next step: picking a platform and a domain name for your blog.
Step 2: Choose a Domain Name and Hosting Provider
After you’ve decided on a niche, you’ll need to select a domain name and hosting provider. Your domain name should be distinct, memorable, and simple to remember. It should also reflect the niche and overall brand of your blog. Your hosting provider should be dependable and provide excellent customer service. This is significant because the uptime and loading speed of your blog can have a significant impact on your user experience and search engine rankings.
Step 3: Set Up Your Blog with Bluehost and WordPress
The third step in starting a blog is to get started with Bluehost and WordPress. Setting up your blog entails configuring important settings such as the site title, permalink structure, time zone, language, and so on. It also entails installing essential plugins such as Jetpack, Akismet, Yoast SEO, and others to help you optimize and secure your blog.
- Click here to go to Bluehost.com (<- that link gets you a discount) and click Get Started Now.
- Choose the Choice Plus Plan.
- Enter the domain name you want to use (i.e., shakirnaseem.com).
- Enter your account information.
- Choose an account plan based on how long you want to pay under Package Information. (Remember, all plans include a 30-day money-back guarantee, so there is no risk!)
- Uncheck the Package Extras.
- Finish your purchase, select a password, and log in to your Bluehost account.
- Answer or skip the onboarding questions, but when prompted, select “blog.”
- When it comes to selecting a theme, select “skip.” (We’ll figure that out later.)
- Click the WordPress button on the top right of the Bluehost dashboard to go to WordPress.
Bluehost installs WordPress with a single click from your hosting dashboard, making it simple to get started with a blog.
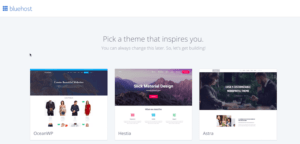
There are numerous appealing free WordPress themes available, including free blog themes.
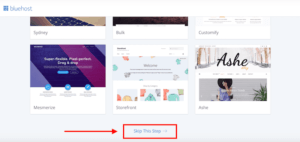
If you want to choose your theme later, skip this step by clicking the “Skip This Step” button at the bottom of the page.
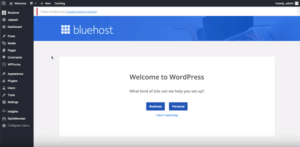
You are taken to a new blog page where you must select the “Start Building” option.
Next, choose the type of site you want to build, and WordPress will guide you through the process with prompts. You can also go straight to your dashboard by clicking “I don’t need help.”
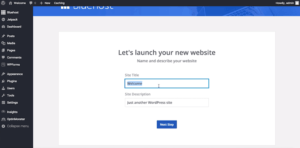
At last, fill out the “Site Title” and “Site Description” fields.
Take your time getting acquainted with the WordPress dashboard from here.
Are you ready to start your blog? Get started for just $2.95/mo. (63% off your hosting plan) with the link below:
To set up your blog with Bluehost and WordPress, you need to follow these steps:
- Log in to your WordPress dashboard using the username and password you created in the previous step.
- Go to Settings > General and enter your site title and tagline. Your site title is the name of your blog that appears in the browser tab, search results, social media posts, etc. Your tagline is a short phrase that describes what your blog is about or what value it offers to your readers. For example, my site title is “Shakir Naseem” and my tagline is “Discover the power of the best AI tools”.
- Go to Settings > Permalinks and choose a permalink structure for your blog. Permalinks are the permanent URLs of your blog posts and pages. They affect how your site is indexed and ranked by search engines, as well as how user-friendly and memorable your URLs are. The best permalink structure for SEO and readability is the “Post name” option, which uses your post title as the URL. For example, https://shakirnaseem.com/how-to-start-a-blog/.
- Go to Settings > Reading and choose a homepage display for your blog. You can either display your latest posts or a static page as your homepage. If you want to display your latest posts, you can also adjust the number of posts per page and whether to show the full text or a summary of each post. If you want to display a static page, you need to create a page first and then select it as your homepage. For example, I use a static page as my homepage and display my latest posts on a separate page called “Blog”.
- Go to Settings > Discussion and configure the settings for comments on your blog. Comments are a great way to interact with your readers and build a community around your blog. However, they can also attract spam and trolls that can harm your reputation and user experience. Therefore, you need to set some rules and guidelines for comments on your blog, such as requiring users to fill out their name and email, moderating comments before they appear, closing comments on older posts, etc.
- Go to Plugins > Add New and install some essential plugins for your blog. Plugins are extensions that add new features and functionality to your WordPress site. There are thousands of plugins available for WordPress, but you don’t need to install them all. You only need a few plugins that will help you optimize and secure your blog, such as:
-
- Jetpack: Jetpack is an all-in-one plugin that offers various features such as site security, performance optimization, social sharing, contact forms, image galleries, related posts, etc.
- Akismet: Akismet is an anti-spam plugin that automatically filters out spam comments and trackbacks on your blog.
- Yoast SEO: Yoast SEO is the best plugin for SEO on WordPress. It helps you optimize your site for search engines by providing tools and suggestions for keywords, titles, meta descriptions, sitemaps, breadcrumbs, etc.
- WPForms: WPForms is the best plugin for creating forms on WordPress. It allows you to create and manage contact forms, feedback forms, survey forms, etc. with a simple drag-and-drop interface.
- MonsterInsights: MonsterInsights is the best plugin for Google Analytics on WordPress. It allows you to connect your site with Google Analytics and view your site’s stats and insights directly from your WordPress dashboard.
To install these plugins, simply search for them in the plugin directory and click on “Install Now”. Then activate them and follow the instructions to set them up.
You have now successfully set up your blog with Bluehost and WordPress. You can move on to the next step: designing and customizing your blog.
-
WordPress is a popular content management system that is easy to use and customize. It is also SEO-friendly, which means it can help you rank higher in search engine results pages. Installing WordPress is easy and can be done with just a few clicks. Once you have installed WordPress, you can start customizing your blog’s design and functionality.
Step 4: Choose a Theme
The next step is to choose a theme for your blog. Your theme should be visually appealing, easy to navigate, and mobile-friendly. There are many free and paid themes available, so choose one that fits your needs and budget. Your theme should also be customizable, allowing you to tweak its design to suit your brand and niche.
Bluehost installs WordPress with a single click from your hosting dashboard, making it simple to get started with a blog.
When you first access your dashboard, you must select a theme.
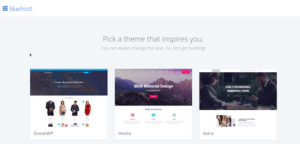
There are numerous appealing free WordPress themes available, including free blog themes.
If you want to choose your theme later, skip this step by clicking the “Skip This Step” button at the bottom of the page.
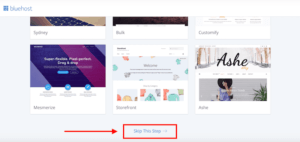
You are taken to a new blog page where you must select the “Start Building” option.
Next, choose the type of site you want to build, and WordPress will guide you through the process with prompts. You can also go straight to your dashboard by clicking “I don’t need help.”
This blog employs the default WordPress theme, and a menu on the left allows you to customize its appearance.
When it comes to themes, you now have two options:
You can choose between a free theme with limited options and a paid theme.
I recommend that you use a blogger-friendly theme such as Kadence or Blocksy.
Here’s how to add a new theme to your WordPress blog:
WordPress is the most popular and user-friendly blogging platform in the world. It allows you to create and manage your blog with ease and flexibility. WordPress is also free and open-source, which means you can customize it to your liking. To install WordPress, you need to follow these steps:
– Log in to your hosting account and access your control panel.
– Find the WordPress icon or the option to install WordPress.
– Click on it and follow the instructions to install WordPress on your domain name.
– Choose a username and password for your WordPress dashboard.
– Log in to your WordPress dashboard using the credentials you created.
Once you have installed WordPress, you need to choose a theme for your blog design. A theme is a collection of templates and styles that define the appearance and functionality of your blog. WordPress has thousands of themes to choose from, both free and paid. You can browse and install themes from the WordPress repository, or upload your own theme from a third-party source. To choose a theme for your blog, you need to follow these steps:
– Go to Appearance > Themes in your WordPress dashboard.
– Click on Add New to browse or search for themes.
– Preview and install the theme that you like.
– Activate the theme and customize it according to your preferences.
Are you ready to start your blog and follow this guide? Begin for $2.95/month and save 63% off your blog hosting plan:
Step 5: Customize Your Blog
The following step in creating a blog is to customize it with a theme and plugins. A theme is a set of files that determine the look and layout of your blog. A plugin is a piece of software that enhances your blog’s functionality or features.
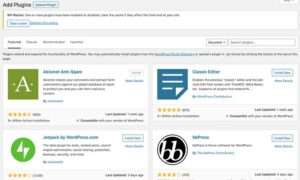
WordPress has thousands of themes and plugins from which to create a unique and appealing blog. Themes and plugins can be browsed and installed from your WordPress dashboard or from third-party sources.
It’s now time to personalize your blog. This includes adding pages, categorizing them, and creating menus. You should also install necessary plugins, such as Yoast SEO, to help you optimize your content for search engines. Customizing your blog is an ongoing process, so make sure to update and improve it on a regular basis based on user feedback and data.
Here are some tips to help you customize your blog with a theme and plugins:
- Choose a theme that matches your blog niche, style, and audience. You can use a free theme or a premium theme that offers more features and support. You can also use a page builder plugin like Elementor or Divi to create custom layouts for your blog pages.
- Install plugins that enhance your blog performance, security, SEO, and user experience. Some of the essential plugins that every blogger should have are Yoast SEO, Jetpack, Akismet, WPForms, etc. You can also use plugins that add specific features to your blog, such as social media sharing buttons, email subscription forms, contact forms, etc.
- Avoid installing too many themes or plugins that may slow down your blog or cause conflicts with each other. Only use themes and plugins that are compatible with your WordPress version and update them regularly to avoid security issues.
Here’s how to install a theme and a plugin on your WordPress dashboard:
- To install a theme, go to Appearance > Themes and click on the Add New button. You can search for a theme by name, category, or feature. You can also upload a theme from your computer by clicking on the Upload Theme button. Once you find a theme that you like, you can preview it by clicking on the Live Preview button or install it by clicking on the Install button. After installing a theme, you need to activate it by clicking on the Activate button.
- To install a plugin, go to Plugins > Add New and click on the Add New button. You can search for a plugin by name, category, or feature. You can also upload a plugin from your computer by clicking on the Upload Plugin button. Once you find a plugin that you like, you can install it by clicking on the Install Now button. After installing a plugin, you need to activate it by clicking on the Activate button.
You can also customize your blog settings by going to Settings > General and changing options such as site title, tagline, time zone, date format, etc.
Step 6: Create Quality Content
The content of any blog is the most important aspect. You should strive to produce high-quality, informative, and engaging content for your readers. This will assist you in building a loyal audience and increasing traffic to your blog. Focus on topics relevant to your niche, use a conversational tone, and provide value to your readers to create quality content.
You can begin creating content once you’ve decided what you’ll be writing about. Write posts that add value to your readers rather than simply copying and pasting from others. To make your post more engaging, you can also include images, videos, infographics, and other visuals.
Here are some tips to help you write and publish your first blog post:
- Choose a topic that is relevant to your blog niche, interesting to your audience, and easy to write about. You can use keyword research tools like Google Keyword Planner or Ubersuggest to find popular topics and keywords that people are searching for online.
- Write an attention-grabbing title that summarizes the main point of your blog post and entices readers to click on it. You can use headline generators like CoSchedule Headline Analyzer or Sharethrough Headline Analyzer to improve your title quality and score.
- Write an engaging introduction that draws the reader in and explains why they should read your blog post. To begin your introduction, use a personal story, a statistic, a quote, a question, or a surprising fact. You can also use your keyword in the introduction to improve the SEO of your blog post.
- Write a clear and concise body that delivers the main points of your blog post. You can use headings, subheadings, bullet points, lists, tables, images, videos, or other visual elements to organize your content and make it easier to read and understand. You can also use internal and external links to provide additional information or resources to your readers.
- You should write a strong conclusion that summarizes your blog post and provides your readers with a call to action. You can request that they leave a comment, share your post, subscribe to your newsletter, download a freebie, or perform any other action you desire. To encourage engagement, you can also end your blog post with a question or a quote.
Here’s how to write and publish your first blog post on your WordPress dashboard:
- To write a blog post, go to Posts > Add New and enter your title and content in the editor. You can use the toolbar to format your text, add media, insert links, etc. You can also use the block editor to add different types of blocks to your content, such as paragraphs, headings, images, quotes, etc.
- To publish a blog post, go to the Publish panel on the right side of the editor and click on the Publish button. You can also save your blog post as a draft or schedule it for a later date by clicking on the arrow next to the Publish button and choosing the appropriate option.
Additional Writing Suggestions.
- Your blogs should always add value to your readers’ lives. Create an outline with a clear beginning, middle, and end. If you understand story arcs and hero’s journeys, you can make even the most mundane topics interesting.
- Make your blog content visually appealing and easily accessible to your readers. Make sure the blog’s textual and visual content is of high quality.
- Use H2 and H3 tags to properly format your headings, and use bulleted lists and images to break up long lines of text. A paragraph should not be more than 3-4 sentences long.
- To connect with your audience, make your first blog posts conversational.
- Include bullet points to help readers swipe through the blog without missing anything important.
Remember that a blog is a living entity that can be updated over time. So, instead of trying to make your content perfect, get your blog online and publish it without hesitation – you can always update it later.
If you haven’t started your blog yet and are ready to go, get started for just $2.95/month (63% off):
Step 7: Promote Your Blog
Finally, it’s time to promote your blog. This includes sharing your content on social media, guest posting on other blogs, and building backlinks to your site. The more exposure your blog gets, the more traffic you will receive. You should also engage with your audience through comments, email newsletters, and social media interactions to build a community around your blog.
You need people to read your blog, and in order to do so, you must promote it. Share your posts on social media, write guest posts for other blogs, and join online communities. You can also optimize your content for search engines by researching keywords in your niche.
Here are some tips to help you promote your blog and get more traffic:
- Optimize your blog for SEO (search engine optimization). SEO is the process of improving your blog’s visibility and ranking on search engines like Google or Bing. SEO involves using keywords, titles, meta descriptions, headings, links, images, etc., to make your blog relevant and useful for search queries related to your topic or niche.
- Share your blog on social media platforms like Facebook, Twitter, Instagram, Pinterest, etc. Social media is a great way to reach and engage with your target audience and drive them to your blog. You can share your blog posts, images, videos, stories, polls, etc., on social media and encourage your followers to like, comment, share, or click on them.
- Build an email list and send newsletters to your subscribers. Email marketing is one of the most effective ways to communicate with your audience and keep them updated on your latest blog posts, offers, news, etc. You can use tools like Mailchimp or ConvertKit to create and send newsletters to your subscribers. You can also use lead magnets like ebooks, checklists, courses, etc., to attract and capture email leads from your blog visitors.
- Guest post on other blogs in your niche or industry. Guest posting is the practice of writing and publishing an article on another blog that has a similar or related topic or audience as yours. Guest posting can help you establish yourself as an authority in your field, build relationships with other bloggers and influencers
Step 8: Monetize Your Blog
Monetizing your blog means generating income from your blog content, traffic, or audience. There are many ways to monetize your blog, depending on your niche, goals, and audience.
Here are some tips to help you monetize your blog:
- Choose a monetization method that suits your blog niche, content, and audience. You can use one or more of the following methods to monetize your blog: advertising, affiliate marketing, sponsored content, digital products, online courses, membership sites, coaching or consulting services, etc.
- Provide value to your audience and build trust with them. No matter what monetization method you choose, you need to offer something valuable and useful to your audience that solves their problems or satisfies their needs. You also need to establish yourself as an authority and a credible source of information in your niche.
- Test and optimize your monetization strategy. You can use tools like Google Analytics or Ubersuggest to track and measure your blog performance and revenue. You can also use tools like Google Optimize or Crazy Egg to run experiments and optimize your blog design, layout, content, offers, etc., for better conversions.Here are some examples of how to monetize your blog:
- Blogging platforms: You can monetize your blog by reviewing different blogging platforms and recommending the best ones for your audience. You can use affiliate links to earn commissions from each sale or sign-up that you generate through your blog.
- WordPress vs Blogger: You can monetize your blog by comparing WordPress and Blogger and highlighting their pros and cons. You can use affiliate links to earn commissions from each sale or sign-up that you generate through your blog.
- Blog niche ideas: You can monetize your blog by providing unique and profitable blog niche ideas for beginners. You can use affiliate links to earn commissions from each sale or sign-up that you generate through your blog.
- Blog monetization: You can monetize your blog by teaching effective strategies to monetize your blog and turn it into a profitable venture. You can use affiliate links to earn commissions from each sale or sign-up that you generate through your blog.
- SEO for bloggers: You can monetize your blog by offering a beginner’s guide to SEO for bloggers. You can use affiliate links to earn commissions from each sale or sign-up that you generate through your blog.
You have now learned how to start a blog in 2023 using simple and easy steps. By following this guide, you will be able to create a successful blog that attracts and engages readers, establishes your authority and credibility, and generates income for you.
I hope you found this guide helpful and informative. If you have any questions or feedback, please feel free to leave a comment below.
Happy blogging!
Conclusion:
It is apparent that starting a blog is fairly simple.
Finally, your blogging success is determined by how quickly you can scale your content publishing and link-building efforts.
Because getting to page 1 is how you rank on Google for valuable terms and earn affiliate revenue.
Starting a blog can seem overwhelming, but by following these steps, you can start your own blog and achieve success.
Remember to choose a niche you are passionate about, create quality content, and promote your blog to attract more traffic. With dedication and hard work, you can create a successful blog that will help you achieve your goals.
It’s now your turn. Why don’t set up a blog right now?
Start a blog right now with Bluehost and get 63% off your hosting plan ($2.95/mo).
FAQ’S
How do I start a blog in 2023?
Starting a blog in 2023 is easier than ever before. Here are the steps you can follow:
- Define your blog’s purpose and goals.
- Choose a niche that aligns with your interests and expertise.
- Decide on a blog name and domain.
- Choose a blogging platform.
- Set up your blog and design its appearance.
- Create content that resonates with your target audience.
- Promote your blog and grow your readership.
- Monetize your blog and make money online.
What are the steps to starting a blog?
If you’re new to blogging, the steps to starting a blog may seem overwhelming. Here’s a simplified overview:
- Choose a blogging platform.
- Register a domain name and web hosting.
- Install a blogging platform on your web hosting account.
- Choose a theme or design your own.
- Configure your blog settings.
- Write and publish your first blog post.
- Promote your blog and engage with your readers.
- Monetize your blog and make money online.
What platform should I use to start a blog?
There are many blogging platforms to choose from, but some of the most popular ones include:
- WordPress.org (self-hosted)
- WordPress.com (hosted)
- Bluehost.com
- Hostinger.in
Each platform has its own pros and cons, so it’s important to choose one that meets your needs and budget.
How do I choose a niche for my blog?
Choosing the right niche for your blog is crucial for its success. Here are some tips to help you:
- Identify your passions and interests.
- Research popular topics and trends.
- Define your target audience.
- Evaluate the competition.
- Choose a niche that is profitable and sustainable.
What are the best practices for creating a successful blog?
Creating a successful blog takes time, effort, and dedication. Here are some best practices to follow:
- Create quality content that is relevant and engaging.
- Optimize your blog for search engines.
- Use visuals to enhance your content.
- Engage with your readers and build a community.
- Promote your blog on social media and other channels.
- Keep your blog updated and fresh.
- Monetize your blog in a way that aligns with your values and goals.
How do I create engaging content for my blog?
Creating engaging content is essential for keeping your readers interested and coming back for more. Here are some tips:
- Choose topics that are relevant and timely.
- Write in a conversational tone.
- Use headlines, subheadings, and bullet points to break up the text.
- Incorporate visuals, such as images and videos.
- Add value by providing insights, tips, and solutions.
- Tell stories that resonate with your audience.
- Encourage feedback and engagement from your readers.
How do I promote my blog and attract readers?
Promoting your blog is essential for attracting readers and building a following. Here are some ways to promote your blog:
- Share your blog posts on social media.
- Engage with other bloggers and online communities.
- Participate in guest blogging and collaborations.
- Use email marketing to reach your subscribers.
- Use paid advertising to promote your blog.
- Attend events and conferences in your niche.
- Provide value and share your expertise in your niche.
What are the ways to monetize my blog and make money online?
Monetizing your blog is a great way to turn your passion into profit. Here are some ways to monetize your blog:
- Advertising: Display ads on your blog and earn money based on impressions or clicks.
- Affiliate Marketing: Promote products or services on your blog and earn a commission for each sale or lead generated.
- Sponsored Content: Partner with brands and create sponsored content or product reviews for a fee.
- Digital Products: Create and sell digital products such as ebooks, courses, or printables related to your niche.
- Physical Products: Sell physical products related to your niche through an online store or third-party marketplace.
- Consulting or Coaching: Offer your expertise and provide consulting or coaching services to your readers.
- Donations: Accept donations from your readers who want to support your work and content.
How much does it cost to start a blog?
Starting a blog can be very affordable, or it can cost a significant amount depending on the route you take. Here are some costs to consider:
- Domain Name: Usually costs around $10 to $20 per year.
- Web Hosting: Monthly hosting fees can range from $2.75 to $25+ per month depending on your hosting provider and plan.
- Blog Theme: You can choose a free theme or purchase a premium theme that can cost between $30 to $100 or more.
- Premium Plugins: Optional premium plugins can cost between $10 to $50+ per year.
- Other Expenses: Marketing, advertising, outsourcing services, and other expenses can add up.
Do I need technical skills or experience to start a blog?
No, no technical skills or experience are required to start a blog. Most blogging platforms provide user-friendly interfaces and intuitive tools for creating and managing blogs. However, basic technical skills can help you customize your blog and troubleshoot problems.
Don’t let a lack of experience hold you back if you’re unsure. There are numerous online resources, such as tutorials and support forums, that can assist you in getting started.




[…] How To Start A Blog […]
Digital Marketing Techniques for Maximum Reach
promote website https://www.cb-top.com.